This is a sponsored post by the folks over at EveryCloud. They have recently developed and released a new tool to help manage and troubleshoot email issues, which is starting to get some traction, especially among Exchange environments. As a mail admin in a previous life, I can sympathize with desire for better monitor tools. Here’s their post.
Managing mail flow is a challenge for every systems administrator, and the price of a mistake is very high. Any interruption in mail flow can spell disaster for a company, disrupting daily operations and leaving the management team, the IT team and the systems administrator scrambling for solutions.
While there are a number of mail flow solutions on the market, they tend to be quite pricey, making it difficult for systems administrators, especially those who work for small businesses and start-ups, to justify the cost.
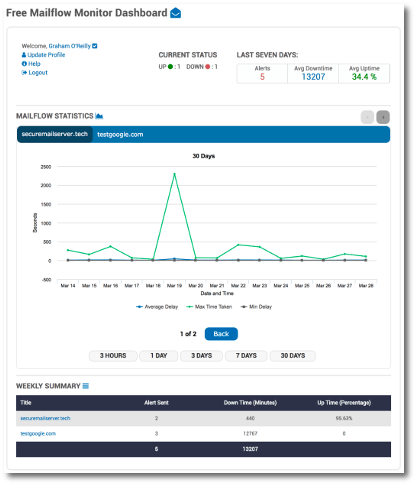
For those who do not already know, the makers behind the EveryCloud mail flow monitor have recently launched a free service – Mail Flow Monitor (MFM). EveryCloud MFM tool is the only free round-trip mail flow monitor on the market, giving systems administrators the ability to observe their organizations’ email systems 24 hours a day, 7 days a week and 365 days a year, all without spending a penny.
Some of the features of Mail Flow Monitor include:
A full-featured round trip monitor, with start-to-finish email tracking and monitoring
Systems administrators can receive real-time text and email alerts whenever a delay or rejection occurs – to your cell phone as well an email or to your alternative email address.
Timely monitoring means issues can be addressed quickly, before they spiral out of control
The system sends a test email every few minutes to a monitoring mailbox on your server. You set up a forward to send the emails back and the Everycloud team does the rest.
MFM is cloud based, which means there is nothing to update or manage.
MSP’s and IT Resellers can create an account and manage as many customers as they wish via the EveryCloud Partner Area, all completely free!
When you consider that competing mail filtering solutions generally cost about $30 a month, it is easy to see the saving potential. That $360 annual cost savings may not seem like much, but since it is assessed on a domain level, the charges can add up quickly. In addition, the per-domain charges can make managing a complex IT operation difficult, an extra level of hard work that systems administrators do not need.
From the smallest startups to the largest multinational corporations, modern businesses live and die on their email. An unexpected email breakdown, significant bottleneck or major failure could make the firm’s email inaccessible and unreliable for hours or even days, and every minute of downtime is costing the company money.
I embarrassingly discovered the other day that I was not receiving metrics or analytics about keyword queries in the Google Analytics console. It turns out that problem was twofold. First, I didn’t have the SSL version of my site enabled in the Google webmaster tools and second, I was serving a cached version of my sitemap that was several months out of date.
To give you an idea of how this issue manifested itself, and how I discovered that there were issues in the first place – here’s what my search keywords were showing as in the Google Analytics console.
Clearly the data is less than useful. The solution to this problem is pretty easy to fix at least.
Fixing the webmaster properties
Open up the Google webmasters site (you should have this setup already, if not go ahead and get signed up and add your WordPress site). If you have recently updated your site to use https, make sure you add a new property in the webmaster tools for the https version of your site that matches your http version.
Doing this will tell google to keep track of search queries for the https version of your site, which should be the default after swtiching. After adding the new https property and indexing it, give it a day or two to start collecting metrics, and check back. Now when you check your search query traffic in the webmaster tools you should start to see all of the search results.
Also be sure to update properties to use https in both the Webmaster console as well as the Analytics console. For example, in the Analytics console under Admin -> Property settings -> default URL, there is an option to use http or https. Likewise, in the webmaster console there is an option for defaulting to http, which is buried in the Google Analytics interface under Admin -> Property settings -> Search Console. Make sure you update ALL of the site settings to use https.
NOTE: It can take some time for queries to begin showing up in the Google Analytics console (it took about two days for them to start showing up for my site after fixing all the https references).
Fixing sitemaps issues
If you find that Google isn’t indexing and using all of your posts and pages, the next thing to look at the sitemaps. A quick way to know if you your sitemaps file is doing its job is to pull open the sitemaps, which can be found under the Crawl -> Sitemaps menu.
The above shows what a healthy sitemap index looks like (after I corrected the problem). There is a button located in the top left of this view that can help you test your sitemap while you are updating your settings. First check for any items in the “issues” column. Also, if the “processed” date here isn’t recent then there is probably an issue. One last thing to check – if there are either no entries in this view or fewer then you expect, something is probably not working.
There are many more knobs and dials you can adjust in the webmaster tools, so if you haven’t played with them much I would recommend spending some time and poking around.
I should quickly mention that my solution assumes that you are using the Google XML Sitemaps plugin. If you’re not using this plugin, and you are either 1) new to WordPress or 2) don’t want to manage your sitemaps file manually, I suggest you enable it. It makes sitemap management so much easier.
After you have the plugin turned on, navigate to your blog settings for sitemaps, which can be located in Dashboard -> Settings -> XML-Sitemap. Clicking the popup should bring up a page similar to the following.
First, make sure everything looks correct in the settings. If you are setting this up for the first time you might need to configure some of the settings. For example, make sure the site name matches the listing, and the options to notify search indexers are all turned on.
When I was troubleshooting the search queries not getting set, I navigated to this menu and immediately noticed that the plugin was showing a warning about using a cached version of my sitemaps.xml file. To fix this warning, there should be an option to remove the cached versions.
Next, there should be an option near the top of the sitemap settings to “notify search engines about your sitemap”. After you have adjusted all the sitemap settings and cleared the cached sitemaps file, click that link to trigger a ping to the search indexers.
Be aware that the crawling process may take up to a few days to index and update so be patient.
Welcome to the thrilling universe of Barz Casino, an online destination offering an exhilarating gaming experience. Whether you are here for the playful slots or the enticing casino bonuses, Barz Casino ensures a service that keeps gamers engaged.
Easy Access with Barz Casino Login
Finding your way into the world of Barz is as simple as accessing their user-friendly Barz Casino login portal. Once logged in, enjoy a seamless navigation through a plethora of games and promotions specifically designed to captivate its users.
Enticing Bonuses and Promotions
One of the standout features is the Barz Casino bonus which can enhance your gaming journey. Players are greeted with exciting Barz Casino free spins and other promotions that add charm to the gaming experience.
The Convenience of Playing Anywhere
With the Barz Casino app, gaming becomes a 24/7 affair. Access your favorite games on the go, and never miss an exciting slot or a special bonus.
Discover more about these offerings and get started by visiting the Barz Casino website. Join the lively community of gamers who have found their favorite online location for both entertainment and lucrative rewards.
Welcome to the ultimate guide on everything you need to know about Jackpot City. Whether you’re a seasoned player or a newcomer, Jackpot City offers a thrilling experience with its casino games, slots, and generous bonuses. With a user-friendly app and a seamless login interface, you’ll be playing your favorite games in no time.
Jackpot City App: Your Gateway to Gaming
Available on multiple platforms, the Jackpot City app provides a convenient way to access hundreds of casino games. With a few taps, you can explore a wide range of choices, from classic slots to modern video slots and table games. The app’s simple interface ensures you have more time to enjoy gaming rather than figuring out how to play.
Unveiling the Jackpot City Bonus
One of the biggest attractions at Jackpot City is the tantalizing bonuses. The Jackpot City bonus structures are designed to maximize your playing potential. New users can look forward to welcome offers and free spins, which can significantly boost your initial bankroll. For existing players, routine promotions and bonuses keep the gaming experience fresh and exciting.
Reasons to Try Jackpot City Free Spins
Free Spin Offer
Eligibility
Welcome Free Spins
Newly registered users
Weekly Free Spins
Regular players
The Jackpot City free spins are quite popular among players. Whether as part of a welcome package or a regular promotion, these spins allow you to try your luck without dipping into your funds.
Accessing Jackpot City: Easy Login
Logging into your Jackpot City account is a breeze with the intuitive Jackpot City login portal. With enhanced security measures, your account details are well-protected, giving you peace of mind as you indulge in online gaming.
Your Journey at Jackpot City Online Casino
The Jackpot City online casino is not just about games but also about offering an immersive experience. Live casino games bring the thrill of real-world casinos to your screen. Players can interact with live dealers, making the online gaming experience even more engaging and lifelike.
Why Choose Jackpot City Slots?
With endless options, Jackpot City slots are a major highlight. Whether you love traditional slots or prefer themed ones, there’s something for everyone. The graphics, soundtracks, and smooth gameplay make Jackpot City a slots paradise.
If you’re ready to explore the world of Jackpot City, start your journey today by visiting the official website. https://jackpotscity-au.org/ offers all the information you need about games, bonuses, and promotions.
Last week I encountered an interesting bug in Rancher that managed to cause some major problems across my Rancher infrastructure. Basically, the bug was causing of the Rancher agent clients to continuously bounce between disconnected/reconnected/finished and reconnecting states, which only manifested itself either after a 12 hour period or by deactivating/activating agents (for example adding a new host to an environment). The only way to temporarily fix the issue was to restart the rancher-server container.
With some help, we were eventually able to resolve the issue. I picked up a few nice lessons along the way and also became intimately acquainted with some of the inner workings of Rancher. Through this experience I learned some tips on how to effectively monitor the Rancher server environment that I would otherwise not have been exposed to, which I would like to share with others today.
All said and done, I view this experience as a positive one. Hitting the bug has not only helped mitigate this specific issue for other users in the future but also taught me a lot about the inner workings of Rancher. If you’re interested in the full story you can read about all of the details about the incident, including steps to reliably reproduce and how the issue was ultimately resolved here. It was a bug specific to Rancher v1.5.1-3, so upgrading to 1.5.4 should fix this issue if you come across it.
Before diving into the specifics for this post, I just want to give a shout out to the Rancher community, including @cjellik, @ibuildthecloud, @ecliptok and @shakefu. The Rancher developers, team and community members were extremely friendly and helpful in addressing and fixing the issue. Between all the late night messages in the Rancher slack, many many logs, countless hours debugging and troubleshooting I just wanted to say thank you to everyone for the help. The small things go a long way, and it just shows how great the growing Rancher community is.
Effective monitoring
I use Sysdig as the main source of container and infrastructure monitoring. To accomplish the metric collection, I run the Sysdig agent as a systemd service when a server starts up so when a server dies and goes away or a new one is added, Sysdig is automatically started up and begins dumping that metric data into the Sysdig Cloud for consumption through the web interface.
I have used this data to create custom dashboards which gives me a good overview about what is happening in the Rancher server environment (and others) at any given time.
The other important thing I discovered through this process, was the role that the Rancher database plays. For the Rancher HA setup, I am using an externally hosted RDS instance for the Rancher database and was able to fine found some interesting correlations as part of troubleshooting thanks to the metrics in Sysdig. For example, if the database gets stressed it can cause other unintended side effects, so I set up some additional monitors and alerts for the database.
Luckily Sysdig makes the collection of these additional AWS metrics seamless. Basically, Sysdig offers an AWS integration which pull in CloudWatch metrics and allows you to add them to dashboards and alert on them from Sysdig, which has been very nice so far.
Below are some useful metrics in helping diagnose and troubleshoot various Rancher server issues.
Memory usage % (server)
CPU % (server)
Heap used over time (server)
Number of network connections (server)
Network bytes by application (server)
Freeable memory over time (RDS)
Network traffic over time (RDS)
As you can see, there are quite a few things you can measure with metrics alone. Often though, this isn’t enough to get the entire picture of what is happening in an environment.
Logs
It is also important to have access to (useful) logs in the infrastructure in order to gain insight into WHY metrics are showing up the way they do and also to help correlate log messages and errors to what exactly is going on in an environment when problems occur. Docker has had the ability for a while now to use log drivers to customize logging, which has been helpful to us. In the beginning, I would just SSH into the server and tail the logs with the “docker logs” command but we quickly found that to be cumbersome to do manually.
One alternative to tailing the logs manually is to configure the Docker daemon to automatically send logs to a centralized log collection system. I use Logstash in my infrastructure with the “gelf” log driver as part of the bootstrap command that runs to start the Rancher server container, but there are other logging systems if Logstash isn’t the right fit. Here is what the relevant configuration looks like.
Just specify the public address of the Logstash log collector and optionally add tags. The extra tags make filtering the logs much easier, so I definitely recommend adding at least one.
Here are a few of the Logstash filters for parsing the Rancher logs. Be aware though, it is currently not possible to log full Java stack traces in Logstash using the gelf input.
if [tag] == "rancher-server" {
    mutate { remove_field => "command" }
    grok {
      match => [ "host", "ip-(?<ipaddr>\d{1,3}-\d{1,3}-\d{1,3}-\d{1,3})" ]
    }

    # Various filters for Rancher server log messages
    grok {
     match => [ "message", "time=\"%{TIMESTAMP_ISO8601}\" level=%{LOGLEVEL:debug_level} msg=\"%{GREEDYDATA:message_body}\"" ]
     match => [ "message", "%{TIMESTAMP_ISO8601} %{WORD:debug_level} (?<context>\[.*\]) %{GREEDYDATA:message_body}" ]
     match => [ "message", "%{DATESTAMP} http: %{WORD:http_type} %{WORD:debug_level}: %{GREEDYDATA:message_body}" ]
   }
 }
There are some issues open for addressing this, but it doesn’t seem like there is much movement on the topic, so if you see a lot of individual messages from stack traces that is the reason.
One option to mitigate the problem of stack traces would be to run a local log collection agent (in a container of course) on the rancher server host, like Filebeat or Fluentd that has the ability to clean up the logs before sending it to something like Logstash, ElasticSearch or some other centralized logging. This approach has the added benefit of adding encryption to the logs, which GELF does not have (currently).
If you don’t have a centralized logging solution or just don’t care about rancher-server logs shipping to it – the easiest option is to tail the logs locally as I mentioned previously, using the json-file log format. The only additional configuration I would recommend to the json-file format is to turn on log rotation which can be accomplished with the following configuration.
Adding these logging options will ensure that the container logs for rancher-server will never full up the disk on the server.
Bonus: Debug logs
Additional debug logs can be found inside of each rancher-server container. Since these debug logs are typically not needed in day to day operations, they are sort of an easter egg, tucked away. To access these debug logs, they are located in /var/lib/cattle/logs/ inside of the rancher-server container. The easiest way to analyze the logs is to get them off the server and onto a local machine.
Below is a sample of how to do this.
docker exec -it <rancher-server> bash
cd /var/lib/cattle/logs
cp cattle-debug.log /tmp
Then from the host that the container is sitting on you can docker cp the logs out of the container and onto the working directory of the host.
From here you can either analyze the logs in a text editor available on the server, or you can copy the logs over to a local machine. In the example below, the server uses ssh keys for authentication and I chose to copy the logs from the server into my local /tmp directory.
With a local copy of the logs you can either examine the logs using your favorite text editor or you can upload them elsewhere for examination.
Conclusion
With all of our Rancher server metrics dumping into Sysdig Cloud along with our logs dumping into Logstash it has made it easier for multiple people to quickly view and analyze what was going on with the Rancher servers. In HA Rancher environments with more than one rancher-server running, it also makes filtering logs based on the server or IP much easier. Since we use 2 hosts in our HA setup we can now easily filter the logs for only the server that is acting as the master.
As these container based grow up, they also become much more complicated to troubleshoot. With better logging and monitoring systems in place it is much easier to tell what is going on at a glance and with the addition of the monitoring solution we can be much more proactive about finding issues earlier and mitigating potential problems much faster.